


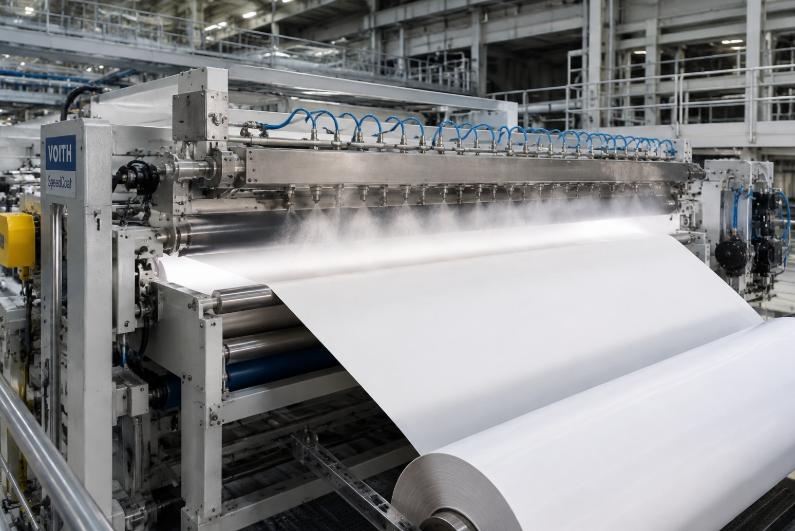
Cómo evitar que la boquilla gotee en el recubrimiento de papel: 4 soluciones de ingeniería probadas para eliminar manchas
Si eres ingeniero de procesos o jefe de mantenimiento en una fábrica de papel, conoces la sensación de hundimiento al ver manchas y estrías en un rollo recién recubierto. Una sola boquilla goteando puede generar toneladas de "rota" (papel de desecho) en cuestión de horas, lo que cuesta miles de dólares en pérdida de rendimiento y tiempos de inactividad no planificados. La causa raíz normalmente no es un misterio: se reduce a la dinámica de fluidos, el desgaste abrasivo y la selección de hardware. En esta guía técnica completa, desglosaremos exactamente por qué las boquillas de recubrimiento gotean y proporcionaremos un marco paso a paso para solucionar problemas para eliminar manchas, optimizar tu sistema de suministro de fluidos y maximizar el tiempo de funcionamiento de tu máquina.
Índice
- [1. Comprender los defectos del recubrimiento: Por qué cada gota te cuesta dinero] (#1-comprender-defectos de recubrimiento-por qué cada gota te cuesta)
- [2. Conceptos Básicos Simplificados: La Anatomía de un Goteo] (#2-Conceptos-Núcleos-Simplificados-la-anatomía-de-un Goteo)
- [3. Guía paso a paso para solucionar problemas para dejar de gotear] (#3-guía-paso-para-de-gotear)
- [4. Consejos de expertos y trampas comunes a evitar] (#4-consejos-expertos--trampas comunes para evitar)
- [5. Conclusión y reflexiones finales](#5-conclusión--reflexiones finales)
- 6. Preguntas frecuentes (FAQ)
1. Comprender los defectos del recubrimiento: por qué cada gota te cuesta dinero
En los mercados altamente competitivos de pasta y papel de Norteamérica y Nórdicos, la eficiencia operativa lo es todo. Al aplicar el color del recubrimiento—ya sea un recubrimiento funcional de barrera o un acabado gráfico brillante—la precisión es innegociable.
Una boquilla que gotea crea áreas localizadas de exceso de humedad y masa de recubrimiento en la red de papel. Cuando esta telaraña llega a la sección de secado, estas zonas pesadas no se secan al mismo ritmo que el papel circundante. ¿El resultado?
- Roturas de telaraña: Tensiones desiguales y perfiles de humedad provocan rupturas catastróficas de telarañas, el enemigo definitivo de la rentabilidad en el molino.
- Rebajas de calidad: Las tiradas con defectos de detección se degradan o desguazan inmediatamente.
- Mantenimiento excesivo: Los operadores se ven obligados a apagar la línea para limpiar manualmente los colectores de pulverización, lo que provoca inactividad innecesaria.
Para solucionar esto, debemos cambiar nuestra mentalidad de "apagar incendios" a diseñar un sistema robusto y sin goteos.
2. Conceptos Básicos Simplificados: La Anatomía de un Goteo
Antes de sumergirse en la resolución técnica de problemas, es fundamental comprender las fuerzas físicas en juego. Podemos desglosar la compleja terminología de ingeniería en un inglés sencillo usando analogías prácticas.
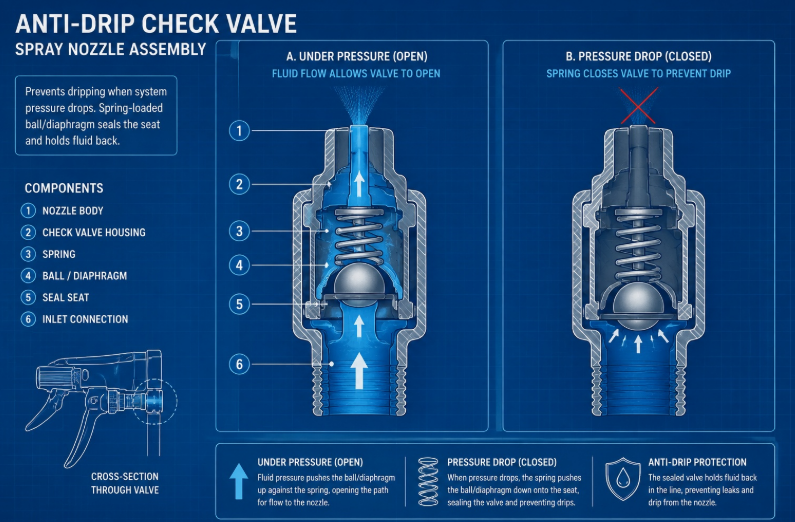
La "Puerta de Muelle Inteligente" (Válvulas Antigoteo) Piensa en una válvula de retención como una puerta inteligente con muelle dentro de tu fontanería. Cuando la bomba del sistema se enciende y se acumula presión, el fluido fuerza la apertura de la puerta, permitiendo un pulverizado perfecto. En el momento en que cierras la bomba, la presión baja y el muelle cierra la puerta de golpe. Esto atrapa todo el líquido residual dentro de la tubería, evitando que incluso una sola gota se filtre sobre el papel.
El "papel de lija líquido" (desgaste de orificio) Los recubrimientos de papel están fuertemente cargados de pigmentos como arcilla caulina y carbonato cálcico precipitado (PCC). Bombear estos fluidos a través de una boquilla diminuta es como volar papel de lija líquido las 24 horas del día. Con el tiempo, los bordes precisos y afilados del orificio de la boquilla se desgastan, volviéndose más grandes y redondeados. Esto destruye el patrón de pulverización diseñado y permite que caigan gotas grandes e incontroladas.
El efecto de "exprimir kétchup" (reología fluida y viscosidad) El color del recubrimiento es un fluido no newtoniano con alta viscosidad. Imagina intentar exprimir una botella casi vacía de kétchup frío. Si no aprietas lo suficiente (baja presión), escupe y salpica en grandes masas. Si aplicas la presión adecuada y constante, fluye suavemente. En el recubrimiento, si la presión de tu sistema baja, el fluido no puede atomizarse en una niebla fina, lo que provoca goteos abundantes.
Tabla Comparativa de Conceptos Básicos
| Factor Técnico | Mala configuración (Causa goteo y manchas) | Configuración ideal (operación sin goteo) | Acción del operador requerida |
|---|---|---|---|
| Sistema de válvulas | Cabezazos abiertos; El líquido residual se drena por gravedad tras el apagón. | Válvulas antigoteo instaladas detrás de cada boquilla. | Instalar válvulas de retención; Verifica la presión de grieta. |
| Condición del orificio | Orificios desgastados, agrandados o visualmente deformados (acero inoxidable). | Orificios afilados y mecanizados con precisión (carburo de tungsteno/cerámica). | Inspección visual regular; Calendario estricto de reemplazos. |
| Viscosidad del fluido | Presión fluctuante; el líquido escupe en lugar de atomizarse. | Presión constante y alta que coincide con el perfil reológico del fluido. | Monitorizar manómetros de bomba; Controla la temperatura del fluido. |
3. Guía paso a paso para evitar goteos
Cuando los operadores reporten manchas en la web, utiliza este marco para aislar y eliminar rápidamente la causa raíz.
3.1 Escenario A: Instalación de válvulas antigoteo (La solución instantánea)
Si tus boquillas gotean inmediatamente después de cerrar el colector de pulverización, la solución casi siempre es una válvula antirretención (también conocida como válvula antigoteo). La gravedad extrae el fluido restante del colector y, sin válvula, cae directamente sobre la lámina.
Implementación paso a paso:
- Seleccione la presión de grietamiento adecuada: Las válvulas de retención se abran a una presión específica (por ejemplo, 5 PSI o 10 PSI). Asegúrate de que la presión de funcionamiento de tu sistema esté muy por encima de la presión de grieta, pero lo suficientemente baja para que la válvula se cierre instantáneamente cuando la bomba se detiene.
- Elige el material adecuado: Como el color del recubrimiento es abrasivo, asegúrate de que la bola o diafragma interna de la válvula de retención esté hecha de materiales resistentes a productos químicos y al desgaste (como Viton o EPDM para los sellos, y cuerpos de acero inoxidable).
- Instalación: Instala la válvula de retención directamente aguas arriba del cuerpo de la boquilla.
3.2 Escenario B: Combatiendo el desgaste de los orificios por recubrimientos abrasivos
Si el goteo ocurre durante un funcionamiento continuo, el desgaste del orificio es el principal sospechoso. Cuando el "papel de lija líquido" agranda el orificio, el caudal aumenta, la presión baja y la atomización falla.
Cómo identificar y arreglar:
- Prueba de caudal: Mide la salida de una sola boquilla durante un minuto. Si el caudal es entre un 10% y un 15% superior a la especificación del fabricante, la tobera está desgastada y debe ser reemplazada inmediatamente.
- Inspección visual del patrón: Utiliza una luz estroboscópica para inspeccionar el patrón de pulverización mientras la máquina está en marcha. Una boquilla desgastada mostrará bordes pesados (chorros sólidos de líquido en los laterales) en lugar de un ventilador uniforme.
- Mejorar materiales: Deja de comprar boquillas baratas de acero inoxidable para estaciones de recubrimiento. El retorno de inversión favorece claramente materiales más duros. Al buscar sustitutos, busca boquillas de pulverización de alto rendimiento para la industria de la pulpa de papel que utilicen insertos de carburo de tungsteno o rubí. Estos duran entre 10 y 50 veces más que el acero inoxidable, reduciendo drásticamente el tiempo de inactividad y la frecuencia de reemplazos.
3.3 Escenario C: Gestión de la viscosidad del fluido y las caídas de presión
La reología del color del recubrimiento cambia con la temperatura y el contenido de sólidos. Si la viscosidad se dispara, la presión actual de la bomba podría ya no ser suficiente para atomizar el fluido.
Plan de acción:
- Monitorizar la presión del colector: Instalar sensores digitales de presión tanto en la entrada como en el callejón sin salida del colector de pulverización. Una caída de presión a lo largo del colector hace que las boquillas del extremo lejano escupan y goteen.
- Control de temperatura: Asegúrese de que el color del recubrimiento se mantenga a la temperatura óptima. Los fluidos fríos son más gruesos y difíciles de atomizar.
- Filtración: Grandes aglomeraciones de arcilla o aglutinantes no dispersos obstruirán parcialmente la boquilla. Un atasco parcial altera la dinámica del flujo interno, haciendo que la boquilla "babee". Implementa sistemas de doble filtro aguas arriba del encabezado.
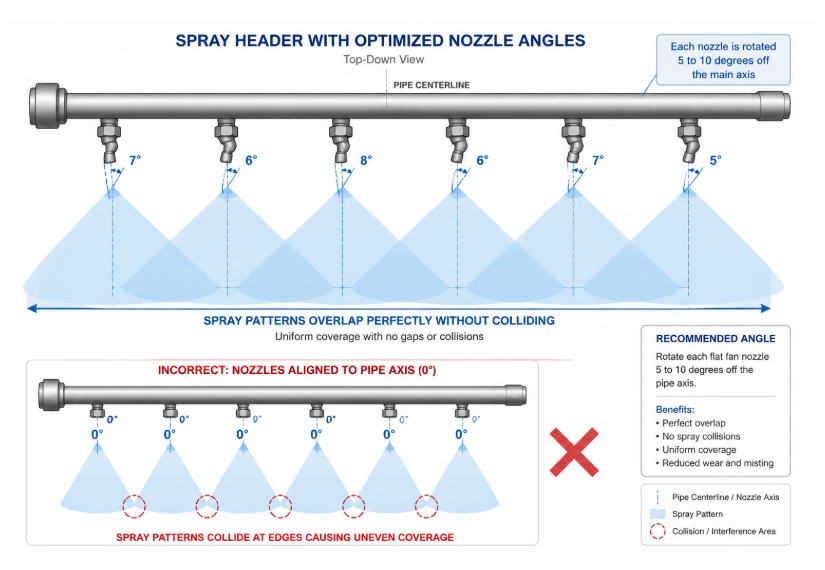
3.4 Escenario D: Optimización de la colocación y ángulo de la boquilla
A veces las boquillas están perfectamente bien, pero están mal instaladas. Si usas boquillas de ventilador planas, sus patrones de pulverización deben solaparse ligeramente para asegurar una cobertura uniforme a lo largo de la banda de papel.
Sin embargo, si las boquillas están perfectamente alineadas en el mismo eje, los bordes de sus patrones de pulverización colisionarán físicamente. Piensa en dos cabezales de ducha apuntando uno hacia el otro: las gotas de agua chocan entre sí, se funden en enormes gotas pesadas y caen directamente sobre la sábana, creando manchas severas.
La regla de los 5 grados: Para evitar esta interferencia, optimizar los ángulos planos de las toberas del ventilador es fundamental. Cada tobera del colector debe rotarse entre 5 y 15 grados respecto al eje de la tubería. Esto permite que los patrones de pulverización se solapen sin que los chorros de fluido colisionen.
Selección de solución: Especificaciones óptimas de la boquilla para el recubrimiento
Al actualizar tu sistema, utiliza esta tabla de datos de especificaciones para ayudarte en tu proceso de toma de decisiones.
| Especificaciones | Montaje estándar (alto riesgo de manchas) | Configuración de alto rendimiento (sin goteos) | Por qué es importante para el ROI |
|---|---|---|---|
| Material | 303 / 316 Acero inoxidable | Inserto de carburo de tungsteno / Cerámica | Reduce el goteo inducido por el desgaste; Extiende la vida útil en meses. |
| Tipo de válvula | Ninguna (Conexión directa por tubería) | Válvula de retención con diafragma con muelle | Elimina el goteo por el apagón; Ahorra un montón de sin dinero durante las paradas. |
| Alineación | 0° (Paralelo al encabezado) | Ángulo de desplazamiento de 5° a 15° | Previene colisiones por aspersión y la formación de gotas abundantes. |
| Filtración | Colador de malla simple | Autolimpiador / Colador de doble cesta | Previene obstrucciones parciales que hacen babear a las boquillas. |
4. Consejos de expertos y trampas comunes que hay que evitar
Basándonos en décadas de experiencia de campo y en debates en foros y comunidades de ingeniería de TAPPI, aquí están los errores más comunes en los que caen los equipos de mantenimiento al tratar con toberas de recubrimiento.
Trampa 1: Sobreapretar las tapas de la boquilla Los operadores suelen creer que si una boquilla gotea desde la base, solo necesita estar más apretada. Apretar demasiado los tapones de retención de latón o plástico distorsiona el sello interno, lo que en realidad causa fugas.
- Consejo de experto: Aprieta los tapones a mano y luego dales un cuarto de vuelta con una llave inglesa. Siempre cambia la junta tórica cuando cambies la punta de la boquilla.
Trampa 2: Ignorar el efecto "golpe de ariete" Si tus válvulas se cierran demasiado rápido en una línea de alta presión, la onda de choque (golpe de ariete) puede dañar los delicados muelles internos de tus válvulas antigoteo.
- Consejo de experto: Usa amortiguadores de pulsación en las tuberías de la bomba para suavizar los picos de presión, protegiendo las válvulas y asegurando un patrón de pulverización constante.
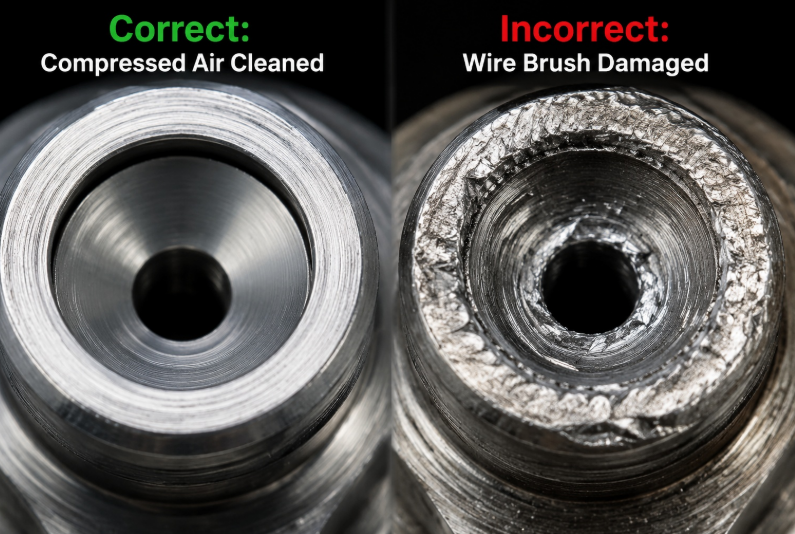
Trampa 3: Limpieza de boquillas con cepillos de alambre Nunca permitas que los operadores limpien una boquilla de recubrimiento obstruida con un cepillo de alambre, un clip o un limpiador de puntas de soldadura. Estas herramientas de metal duro rayarán instantáneamente el orificio mecanizado con precisión, arruinando permanentemente el patrón de pulverización y garantizando goteos.
- Consejo de experto: Remojas las boquillas tapadas en un disolvente especializado para limpiar y usa palillos de madera o aire comprimido para eliminar obstrucciones.
5. Conclusión y reflexiones finales
Eliminar las manchas causadas por el goteo de la boquilla en el proceso de recubrimiento de papel no depende de la suerte; Se trata de una estricta adhesión a los principios de dinámica de fluidos y un mantenimiento proactivo. Al comprender la naturaleza abrasiva del color del recubrimiento y la mecánica de la presión, puedes diseñar un sistema que proteja tu red de papel de defectos costosos.
6. Preguntas frecuentes (FAQ)
P1: ¿Por qué mi boquilla de recubrimiento de papel gotea después de apagarse? R: La causa más común es la falta o rota de válvulas antigoteo. Cuando la bomba se detiene, la gravedad extrae el fluido residual del colector a través de la boquilla. Una válvula antirretención con resorte se cierra instantáneamente cuando la presión baja, atrapando todo el líquido dentro de la tubería y evitando goteos tras el apagón.
P2: ¿Cómo sé si el orificio de mi boquilla está desgastado? R: Realizar una prueba de caudal—medir la salida durante un minuto. Si el caudal supera un 10-15% las especificaciones del fabricante, el orificio se agranda por desgaste abrasivo. También inspecciona los patrones de pulverización con una luz estroboscópica; las boquillas desgastadas muestran bordes pesados en lugar de ventiladores uniformes. Cambia inmediatamente para evitar goteos incontrolados.
P3: ¿Qué material de boquilla debería usar para recubrimientos de papel abrasivo? R: Evita el acero inoxidable estándar para estaciones de recubrimiento. Los pigmentos (arcilla caolínica, PCC) actúan como papel de lija líquido, desgastando rápidamente los metales blandos. Actualiza a boquillas insertadas de carburo de tungsteno o rubí: duran entre 10 y 50 veces más que el acero inoxidable, manteniendo patrones de pulverización precisos y reduciendo drásticamente la frecuencia de reemplazo.
P4: ¿Por qué mis boquillas planas de ventilador crean puntos pesados entre los patrones de pulverización? R: Si las boquillas están perfectamente alineadas paralelas (0°), sus bordes de pulverización colisionan físicamente. Las gotas se fusionan en enormes y pesadas gotas que caen sobre la telaraña. Gira cada tobera entre 5 y 15 grados respecto al eje del cabecero; esto permite que los patrones se solapen sin necesidad de colisión de corriente.
P5: ¿Puede la temperatura afectar al goteo de la boquilla del recubrimiento? R: Sí. El color del recubrimiento no es newtoniano: el fluido frío se vuelve más espeso y difícil de atomizar, provocando salpicaduras y goteos. Mantener la temperatura óptima del fluido y monitorizar la presión de la bomba con sensores digitales tanto en la entrada como en el extremo muerto del cabezal para asegurar una atomización consistente en todas las toberas.
P6: ¿Cuál es la forma correcta de limpiar las boquillas de recubrimiento obstruidas? R: Nunca uses cepillos de alambre, clips o herramientas metálicas: rayan orificios de precisión y arruinan permanentemente los patrones de pulverización. Remojad las boquillas en disolvente especializado para limpiar y utilizad palillos de madera o aire comprimido para eliminar obstrucciones. Siempre cambia las juntas tóricas al cambiar las puntas de las boquillas.
Tabla resumen rápida para operadores de molinos
| Problema observado | Chequeo inmediato | Solución a largo plazo |
|---|---|---|
| Gotea justo después del apagón | Revisa si faltan o se rompen las válvulas de retención. | Instala válvulas antigoteo de alta resistencia en todos los colectores. |
| Bordes pesados / Escupita durante la carrera | Comprueba la presión de la bomba y la viscosidad del fluido. | Actualización a toberas de carburo de tungsteno; estabilizar la temperatura. |
| Grandes gotas cayendo entre boquillas | Comprueba el ángulo de alineación de la boquilla (colisión de 0°). | Desplace todas las boquillas planas del ventilador entre 5° y 15°. |
| Babeo aleatorio de boquillas específicas | Revisa si hay obstrucciones parciales o juntas tóricas dañadas. | Implementar doble filtración; Prohíbe la limpieza de cepillos de alambre. |
No dejes que una boquilla desgastada de 50 dólares cause 5.000 dólares de inactividad y desperdicie papel. Empieza revisando hoy mismo tus colectores de pulverización actuales. Comprueba la alineación de la boquilla, verifica que las válvulas de retención funcionen y haz la transición a materiales resistentes al desgaste para tus recubrimientos de alta viscosidad.